Apple Pay
Introduction
Before accepting payments via Apple Pay, follow the steps in the sections below. On completing these steps, you can start developing your mobile application (mobile app development documentation is not included in this document, for more information see Apple Pay documentation).
Create Merchant ID
To create your Merchant ID, follow these steps.
- In the personal area of the Apple Member Center, go to Certificates, Identifiers & Profiles.
- In the Identifiers section select Merchant IDs.
- On the resulting page click + (Add) in the right upper corner.
- In the Merchant ID Description and Identifier fields enter a description of your Apple merchant identifier and the identifier itself accordingly.
- Click Continue.
- On the resulting page check the data you entered and click Register.
- On the resulting page click Done.
Certificate registration
To receive payments via Apple Pay, you need to have a key pair (private and public key) and the corresponding public key certificate. The required actions in the Personal Area depend on whether you already have a key pair and the corresponding certificate or not.
| Initial conditions | Required steps |
|---|---|
| You do not have a key pair and the public key certificate |
After that the following actions will become available. |
| You have a key pair and your public key certificate is registered at Apple Pay |
Upload the file containing your key pair After that the following actions will become available. |
Create new certificate
To create a key pair, follow these steps.
- Log in to your personal cabinet and click
 in the left panel (Wallet certificates section).
 - Go to Apple Pay tab.
- Click Create key pair.
The following form will display.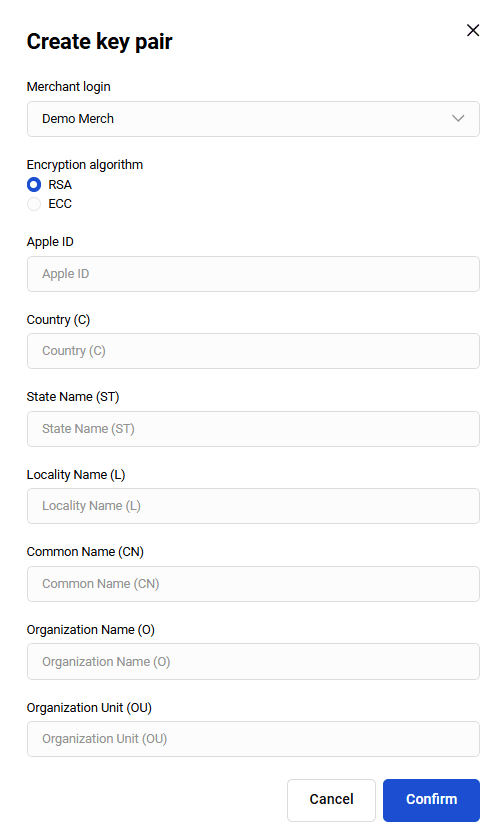
- Fill in the required fields (see the table below).
| Setting | Description |
|---|---|
Encryption algorithm |
This radio button allows to select one of the two cryptographic algorithms that will be used for key pair generation.
|
Country (C) |
Enter two-letter code of the country where your organization is located. |
Locality Name (L) |
Enter the name of the locality where your organization is located. |
Organization Name (O) |
Enter the name of your organization. |
Apple ID |
Merchant Apple ID. |
State Name (ST) |
Enter state name where your organization is located. |
Common Name (CN) |
Enter the domain name of your site, for example, test.com. |
Organization Unit (OU) |
Enter the name of your organization unit. |
- After making the necessary changes click Confirm.
The created key pair will be displayed in the Apple Pay tab (see the figure below).

Proceed to CSR download
Upload previously created certificate
To upload an existing key pair, follow these steps.
- Log in to your personal cabinet and click
 in the left panel (Certificates section).
 - Go to Apple Identity tab.
- Click Add key.
The following form will be displayed.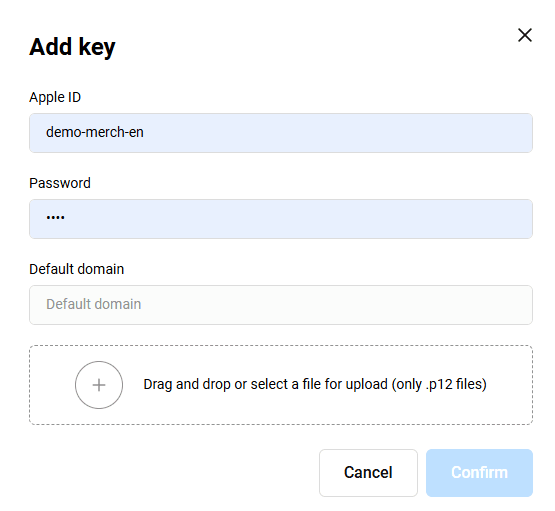
- Fill in the following fields.
- Apple ID - enter your Merchant Apple ID.
- Password - enter the password for your PKCS12 file.
- Default domain - enter the domain of your online store.
- Drag your key pair file to the designated area on the page.
It will be displayed below.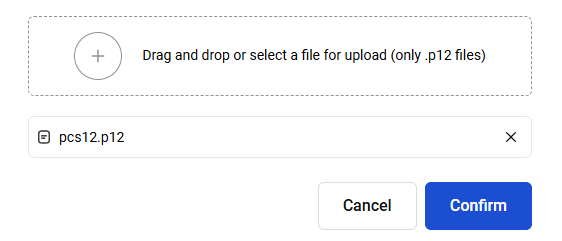
- Click Create. The uploaded key pair will be displayed in the Apple Identity section.
After uploading your key pair the following actions will become available.
Export CSR
To download CSR, follow these steps.
- Log in to your Personal Area and click
 in the left panel (Certificates section).
 - Select the required payment service (Apple Pay, Google Pay, or Samsung Pay).
- Click
 next to your certificate and select Download key (see the figure below).
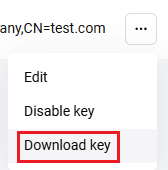
Save file dialog will display. - Specify the path to which the file will be saved or save it to the default folder.
Also, the following actions are available.
Edit Merchant ID
To edit your Apple Merchant ID, follow these steps.
- Log in to your Personal Area and click
 in the left panel (Certificates section).
 - Select Apple Pay.
- Click
 and select Edit. (see the figure below).
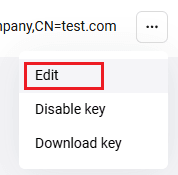
The following form will be displayed.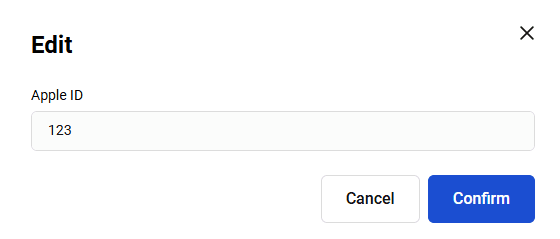
- Edit Apple ID field and click Confirm.
Disable certificate
To disable a certificate (key), follow these steps.
- Log in to your Personal Area and click
 in the left panel (Certificates section).
 - Select the required payment service (Apple Pay, Google Pay, or Samsung Pay).
- Click
 next to your certificate and select Disable key (see the figure below).
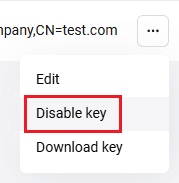
The following dialog will display.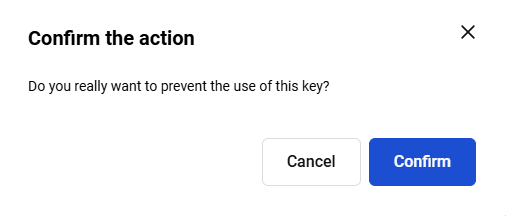
- Click Confirm.
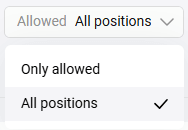
Whether a disabled certificate is displayed in the personal area depends on Allowed setting that is at the top of the Certificates section (see the figure below).
| Setting | Description |
|---|---|
| Only allowed | Disabled certificates are not displayed in the keys list. |
| All positions | Disabled certificates are displayed in the keys list. Allowed cell will have No value (see the figure below).
|
Actions necessary for web integration
For Web integration, follow these steps.
- Register and confirm your domain in Apple.
- If the payment page is located on your side, register your domain.
- If the payment page is located on the payment gateway side, specify the payment gateway domain.
- Create a merchant identification certificate, convert it to a
.pemfile, and upload it to your server.
This certificate is used to authenticate connections to Apple Pay servers.
Registration of a domain in Apple
To register a certificate in Apple, follow these steps.
- Log in to your Apple developer account at https://developer.apple.com.
- Follow Apple developer account help instructions to register a domain.
Select the previously created merchant ID when prompted.
Integration scheme
- The user in the mobile application selects the payment option using Apple Pay.
- The payment data is sent to the Apple Pay system for processing.
- To process the payment data an object PKPaymentToken Object, which has paymentData attribute, is created in the Apple Pay system (here and further see Apple Pay documentation).
- Apple Pay sends a response to the merchant (mobile application).
- The merchant exctracts paymentData attribute out of received PKPaymentToken Object object and encodes its contents in Base64.
- The merchant creates a payment request containing paymentDataattribute, which is received from the Apple Pay response and encoded in Base64, and sends it to the payment gateway for processing (see Request for payment via Apple Pay).
- The payment system processes the request.
- The payment system returns a response with the result.
- The mobile application displays the payment result to the user.
Reference links
| Link | Description |
|---|---|
| Apple Pay | A section of the apple.com site containing general information on Apple Pay. |
| Developer Apple Pay | A section of the apple.com site dedicated to developers and containing links and reference information concerning Apple Pay. |
| Apple Pay Sandbox | A section of the apple.com site containing information on testing. |
| Apple Pay Guide | A section of the apple.com site containing a programming reference. |
| Apple Pay Guidelines | A section of the App Store reference dedicated to Apple Pay. |
| Apple Pay API | API reference (application programming interface). |
| PKPaymentToken Object structure | Description of the PKPaymentToken Object structure. |
| Login page | The development environment login page. |
| Getting Started with Apple Pay | PDF document containing general information on Apple Pay and reference links. |
| Apple Pay Marketing Guidelines | Description of how to add the Apple Pay button on your website. |
Google Pay
Introduction
There are several implementation options for Google Pay™ that support both CRYPTOGRAM_3DS and PAN_ONLY authentication methods.
| Payment option | Description |
|---|---|
| From your mobile application | Payment is made from your mobile application installed on customer's mobile device. In this scenario the application requests encrypted data from Google Pay. This data must be sent to the payment gateway. To use this option, you must integrate your application with Google Pay API. |
| From a Web payment page on your side | Payment is made from a Web page. In this case, the merchant requests the encrypted payment data from Google Pay. Then the merchant must send this data to the payment gateway. To use this option, you must integrate your web site with Google Pay API. |
| From a Web payment page located on the side of the payment gateway | Payment is made from a Web page. In this case, the merchant redirects the customer to the payment page on the payment gateway side. In this case, the merchant redirects the customer to the payment page on the payment gateway side, and must meet Google Pay requirements: |
How to integrate with Google Pay API
If you want to use Google Pay as a Payment method on your own payment page, you need to integrate your Android app or website with the Google Pay API via Google Pay & Wallet Console. Please follow this instruction: Google Pay API & Google Pay & Wallet Console.
On step 4 of the instruction (for Android app or website respectively), when completing the tutorial, specify the tokenization type 'PAYMENT_GATEWAY':
const tokenizationSpecification = {
  type: 'PAYMENT_GATEWAY',
  parameters: {
    'gateway': 'example',
    'gatewayMerchantId': 'exampleGatewayMerchantId'
  }
};
and replace example and exampleGatewayMerchantId with the values for BPC payment provider from the table of payment providers:
-
gateway=bpcpay -
gatewayMerchantId- merchant login in payment gateway

As a result of integration with Google Pay API, you will be assigned Google Merchant ID that is displayed on the top-right corner of the page in Google Pay & Wallet Console.

Integration schemes
Payment from a mobile app
- A customer selects to pay via Google Pay.
- The application requests masked card data from Google Pay.
- Google Pay returns masked card data to the application.
- The application displays the masked card data to the customer.
- The customer confirms payment.
- The application requests encrypted card data from Google Pay .
- Google Pay encrypts the data using merchant's public key.
- Google returns the encrypted payment data to the application.
- The application sends a Google Pay payment request to the payment gateway, the request contains the token received from Google Pay.
- The payment gateway decrypts the received token and processes the payment.
- The payment gateway returns the payment result to the application.
- The application displays the payment result to the customer.
Payment page is on the the online store side
- The customer creates an order on the online store Website and chooses to pay via Google Pay.
- The online store generates a request for Google Pay.
- The Google Pay generates the encrypted payment data.
- The online store receives the encrypted payment data.
- The online store generates a Google Pay payment request, the request contains the received encrypted payment data.
- The payment gateway decrypts the received data and makes the payment.
- The payment gateway returns the payment result to the online store.
- The payment result is displayed to the customer.
Payment page is on the payment gateway side
If the payment page is located on the Google Pay side, the scheme is the following.
- A customer creates an order on the merchant's Website.
- The merchant registers the order in the payment gateway.
- The payment gateway returns a unique order number and the URL to which the customer must be redirected.
- The store system redirects the customer to the URL from step 3.
- The customer's browser opens the URL.
- The customer receives a payment form.
- The customer choose to pay via Google Pay and confirms the choice.
- The payment data is exchanged between the payment gateway and Google Pay - the payment gateway receives the payment data.
- The payment gateway processes the payment.
- The customer is redirected to the final page.
- The customer's browser displays the final page.
- The payment status is displayed.
Payment via Google Pay using 3DS2
When you use payment via Google Pay with the /google/payment.do request, you can use customer authentication with 3DS2. In this case, you must send a payment request to the payment gateway twice for each transaction. Sending the first request initiates the 3DS2 authentication procedure, and sending the second request continues the procedure with the data received from the 3DS server (an additional component that interacts with payment systems and ACS).
If the customer is redirected to the online store's page after authentication, you must complete the payment by sending the finish3dsVer2Payment.do request.
Payment with /google/payment.do using 3DS2
Below is the scheme of payment with the /google/payment.do request (token decryption on the Payment Gateway side) using 3DS2.
(decrypted token in Base64) PG ->> PG: Token decryption PG -->> Merchant: Response to the first request Merchant ->> 3DS server: Call a hidden iframe (threeDSMethodURLServer) opt threeDSMethodURL is in response Merchant ->> ACS: Call a hidden iframe (threeDSMethodURL) end Merchant ->> PG: The second google/payment.do request PG -->> Merchant: Response to the second request opt Redirection to ACS is required Merchant ->> ACS: CReq (Challenge request) ACS -->> Client: HTML form to pass authentication Client ->> ACS: Confirmation of authenticity ACS -->> Client: Authentication result and redirection to the store page Merchant ->> PG: finish3dsVer2Payment.do PG -->> Merchant: Response to the request end Merchant ->> PG: Order status request PG -->> Merchant: Response to the order status request Merchant -->> Client: Displaying the result
- A customer chooses to pay via Google Pay.
- The application requests Google Pay masked card data.
- Google Pay returns the masked card data.
- The application displays the masked card data to the customer.
- The customer confirms payment.
- The application requests Google Pay the encrypted card data.
- Google Pay encrypts the data using your public key.
- Google Pay returns the encrypted payment data to the application.
- Order payment - stage 1. The merchant sends decrypted paymentToken to the payment gateway by sending the /google/payment.do request.
- The payment gateway decrypts the received token.
- The payment gateway checks on the 3DS server whether the customer can authenticate using the 3DS2 Protocol and sends the response. The response also returns the following parameters:
-
is3DSVer2- 3DSv2 authentication capability flag (true/false) -
threeDSServerTransId- transaction identifier assigned by the 3DS server. -
threeDSMethodURLServer- address of the 3DS server for collecting browser data. -
threeDSMethodURL- (optional) address of the ACS server for collecting browser data. -
threeDSMethodDataPacked- (optional) data for collecting browser data on ACS.
-
- The merchant calls
threeDSMethodURLServerin a separate "iframe" with the help of the POST method. This allows the 3DS server to collect data about the customer's browser. - (Optional step) If
threeDSMethodURLandthreeDSMethodDataPackedparameters were received in the response to the order payment request, the merchant callsthreeDSMethodURLin a separate iframe using the POST method. In this method, it's necessary to pass the value, received in thethreeDSMethodDataPackedparameter in the response to the order payment request. It is necessary to pass it in a parameter calledthreeDSMethodData. This allows the ACS to collect data about the customer's browser. -
Order payment - stage 2. The merchant resends the
/google/payment.dorequest to complete the order (or make a money transfer). You must pass thethreeDSServerTransIdparameter - the transaction identifier which was created by the 3DS server and returned at step 11. Additionally, to redirect the customer to the store's page after the order is paid, the redirect link may be passed in the parameterthreeDSVer2FinishUrl. - The payment gateway interacts with 3DS server and ACS to find out if the customer needs to authenticate on ACS and sends the response to the payment request. If the customer needs to authenticate on ACS, the response returns
acsUrl– the URL for redirecting to ACS andpackedCReq– the packed data for challenge request. Else – the successful payment response is received. -
If the customer does not need to authenticate on ACS, go to the step 22 of this procedure.
If the customer needs to authenticate to the ACS, the payment page is redirected to
acsUrlwith thecreq=packedCReqparameter received at step 15. ACS displays an HTML form for authentication to the customer.
The customer is authenticated.
ACS redirects the customer to the store's page.
To complete a transaction, the merchant sends the finish3dsVer2Payment.do request to the payment gateway passing the
threeDSServerTransIdparameter - the transaction identifier which was created by the 3DS server and returned at step 8.The payment gateway sends the merchant a response to the request.
The merchant sends an extended request for the order status getOrderStatusExtended.do to the payment gateway to find out the order status.
The payment gateway sends a response to the request.
The merchant displays the result page to the customer.
Requirements for the payment page on merchant's side
Payment page on the merchant's side must meet the following requirements.
- The payment page must be able to redirect a customer to 3-D Secure server after calling requesting the payment method if the decrypted token contains payment method
CARD. - The payment page must contain the Google Pay button.
- The payment page must contain a script that checks whether the Google Pay payment button can be displayed (see the code example below).
paymentsClient.isReadyToPay({allowedPaymentMethods: allowedPaymentMethods})
    .then(function(response) {
      if (response.result) {
        // in this case the button should be displayed
        addGooglePayButton();
      }
    })
    .catch(function(err) {
      // show error in developer console for debugging
      console.error(err);
    });

function addGooglePayButton() {
  var button = document.createElement('button');
  button.className = 'google-pay';
  button.appendChild(document.createTextNode('Google Pay'));
  sbutton.addEventListener('click', onGooglePaymentButtonClicked);
  document.getElementById('container').appendChild(button);
}- Google JavaScript must be enabled (for more information see Google documentation:
- For a testing, the value of the environment attribute must be set as
TEST(see the code example below).
var paymentsClient =
    new google.payments.api.PaymentsClient({environment: 'TEST'});
The value for the main version of the page must be obtained from Google after performing checks (for more information see. Google documentation: https://developers.google.com/pay/api/web/guides/test-and-deploy/integration-checklist)).
-
The payment page must contain
paymentDataRequestobject (see the code example below). Use following test data:-
gateway-bpcpay(or - as provided during sandbox on-boarding) -
gatewayMerchantId- as provided during sandbox on-boarding
-
function getGooglePaymentDataConfiguration() {
  return {
    merchantId: '00000000000000000000', //constant for the bank's RBE; for the environment: 'TEST' is not indicated
    transactionInfo = {
        totalPriceStatus: 'FINAL',
        totalPrice: '123.45', //amount in major units
        currencyCode: 'BGN' //ISO 4217
    },
    paymentMethodTokenizationParameters: {
        tokenizationType: 'PAYMENT_GATEWAY',
        parameters: {
            gateway: 'some-bank', //constant for the bank's RBE
            gatewayMerchantId: 'exampleGatewayMerchantId' //merchant identifier in the payment gateway
        }
    },
    allowedPaymentMethods: ['CARD', 'TOKENIZED_CARD'],
    cardRequirements: {
        allowedCardNetworks: ['MASTERCARD', 'VISA']
    }
  };
}- After clicking Google Pay button the
paymentDataRequestobject must be passed to Google Pay (see the code example below).
var paymentDataRequest = getGooglePaymentDataConfiguration();
paymentsClient.loadPaymentData(paymentDataRequest).then(function(paymentData){
  processPayment(paymentData);
}).catch(function(err){
  // show error in developer console for debugging
  console.error(err);
});Create key pair
To create a key pair, follow these steps.
- Log in to your personal area and click
 in the left panel (Certificates section).
 - Go to Google Pay tab.
- Click Create key pair.
The following form will be displayed.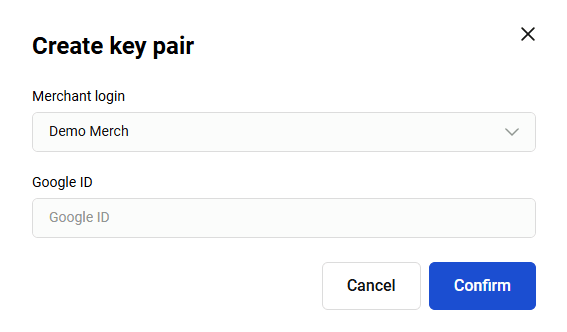
- Fill in the Google ID field with your Google Merchant ID obtained from Google Pay during integration with Google API, then click Confirm.
- The created key pair will be displayed in the keys list (see the figure below).

Download public key
To download your public key, follow these steps.
- Log in to your personal area and click
 in the left panel (Certificates section).
 - Go to Google Pay tab.
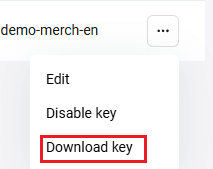
- Click
 next to your certificate and select Download key (see the figure below).
- In the Save file window select the path to which the file will be saved or save it to your default folder.
Also, the following action are available.
Edit Google ID
To edit your Google ID, follow these steps.
- Log in to your Personal Area and click
 in the left panel (Certificates section).
 - Select Google Pay.
- Click
 next to your certificate and select Edit (see the figure below).
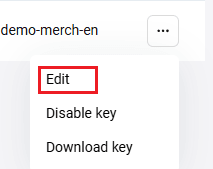
The following form will be displayed.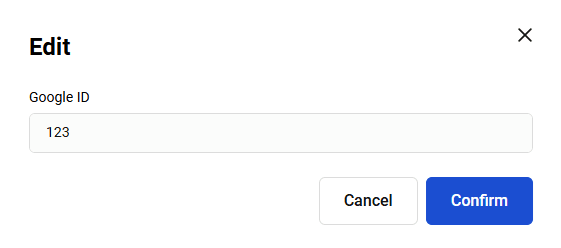
- Edit the Google ID field, then click Confirm.
Disable certificate
To disable a certificate (key), follow these steps.
- Log in to your Personal Area and click
 in the left panel (Certificates section).
 - Select the required payment service (Apple Pay, Google Pay, or Samsung Pay).
- Click
 next to your certificate and select Disable key (see the figure below).
The following dialog will display.
- Click Confirm.
Whether a disabled certificate is displayed in the personal area depends on Allowed setting that is at the top of the Certificates section (see the figure below).

| Setting | Description |
|---|---|
| Only allowed | Disabled certificates are not displayed in the keys list. |
| All positions | Disabled certificates are displayed in the keys list. Allowed cell will have No value (see the figure below).
|
